Tuesday, July 24, 2018

Station Creation | Sundae Funday

If you’ve ever struggled creating a topping station, we don’t blame you. Finding the perfect configuration can be a tough task – but we’re here to help! Just follow along with our Station Creation Guide!

The Goal

With summer weather finally here and National Hot Fudge Sundae Day just around the corner, it’s time to organize the perfect station.

If you’re like most restaurant owners, your kitchen space is limited. Creating a tiered station keeps horizontal space to a minimum by maximizing the depth of your dessert assembly area. By tiering this station, you’ll reduce counter space width from 30” down to 15”!

Everyone knows a good sundae comes complete with hot fudge or hot caramel - or both - but what about all the extra goodies? In this tiered station, keep whipped topping, pumpable butterscotch sauce and scoopable strawberry sauce cool in the top tier, and hold cherries, nuts and sprinkles in the bottom tier.


Select your Base 

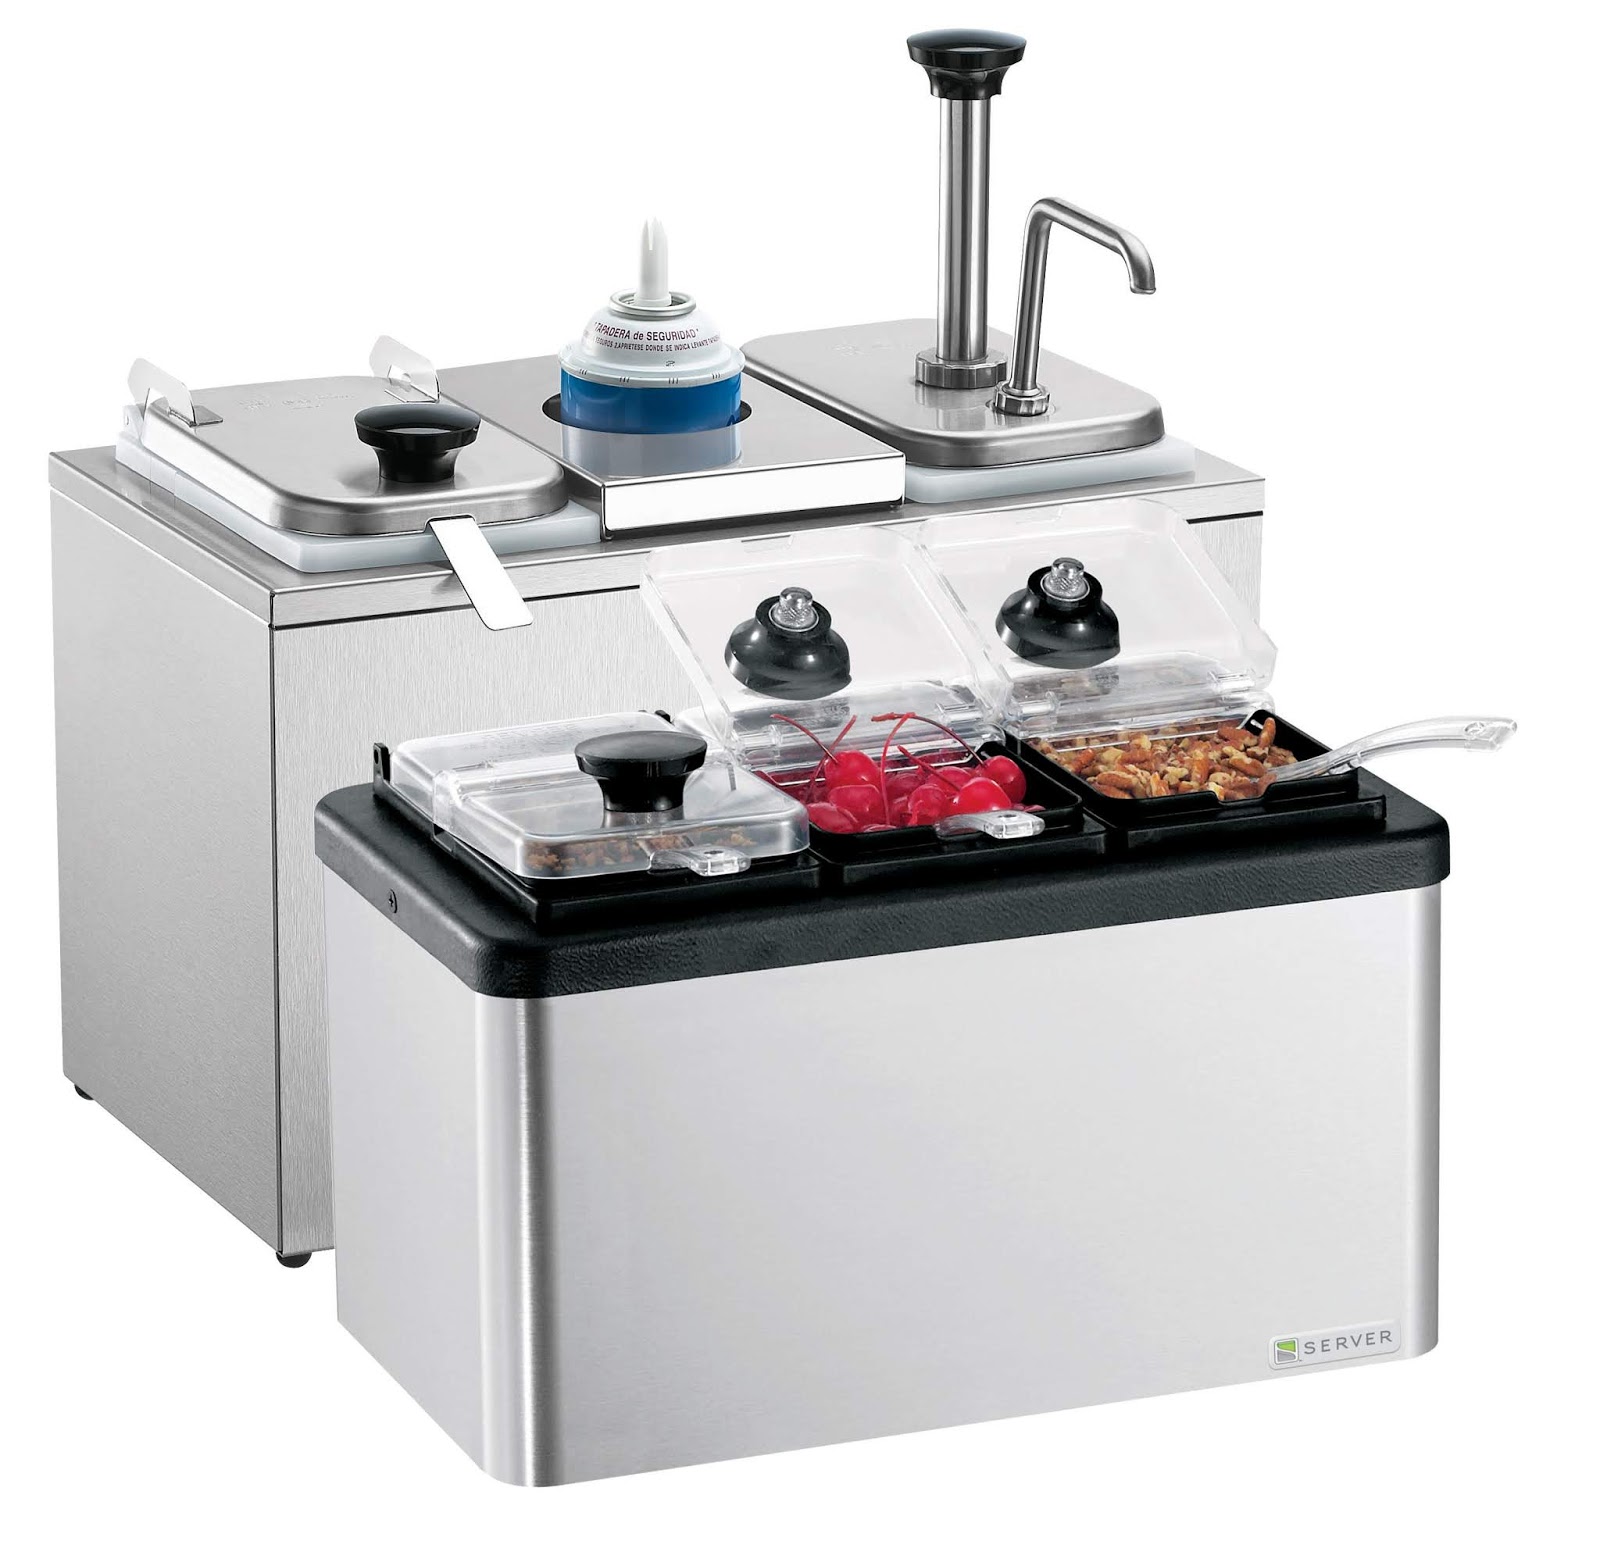
Free Pass! The bottom tier is already an established Mini Ladle combo – the MB-3 87290 station includes (3) deep 1/9-size jars, clear plastic hinged lids and ½ oz clear plastic spoons! There will be plenty of clearance above the lid to fit your serving dish below the top tier's pump. Eutectic ice packs (94013) are sold separate (See sheet 02108 for details).

For the top tier, you’ll need to hold (3) standard-sized fountain jars – and keep them cool – so select the countertop insulated SB-3 83760 base.


Select your Jars

As shown in the diagram, the SB-3 base holds 3 standard fountain jars – in this case, we’ll need two deep jars for the pumpable sauce and the ladled strawberry sauce. Deep jars hold 3 ½ qt, or about (112) 1 oz servings. Keep a few jars (82557) stocked in a cooler for fresher toppings and quicker changeouts!

To keep your whipped topping can cool, Server offers a gel-filled, re-freezable Whipped Topping Can Cooler Kit (82847) with a specialized insert and lid to hold the can upright and keep the tip from touching the bottom of the jar when stored upside down.

Fun fact! Get a spare Can Cooler Kit with a black jar (82846) to switch out for day and night shifts.

Select Pumps, Lids and Ladles 

When selecting a pump, the first thing to look at is base type. These are split between countertop and drop-in. For this station, the base type is countertop.


Second, note the jar the pump needs to fit: this ensures you get the proper cylinder length to reach the bottom of the jar. For this station, it's a deep fountain jar.


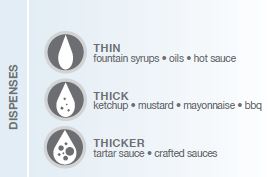
Third, use the “Dispenses” key to determine the viscosity of your food. Ice cream syrups generally fall under “Thin.” You’ll end up with an FP-V (82120) pump.


For the strawberry sauce jar, select the 10 inch fountain jar ladle (82561) and stainless steel hinged lid (82545), which attaches to the jar and stays open for easier handling while you scoop.

Lastly, keep contents cold with a few square Eutectic ice packs (94141); your base holds (3), so (6) ice packs will aid timely changeouts.

Keep a hot fudge and caramel warmer nearby, and voila! The perfect Sundae Funday station.


Sundae Funday Station Components
(1) 87290 | MB-3 Mini Cold Ladle Combo
(1) 83760 | SB-3 Countertop Insulated Base
(2) 82557 | Standard, deep jar, white
(1) 82847 | Topping Can Cooler Kit, white
(1) 82120 | FP-V pump
(2) 82561 | 1 oz ladle, 10” handle
(2) 82545 | Stainless steel hinged lid
(3) 94141 | Eutectic ice pack

Spare Accessories
(1) 82846 | Topping Can Cooler Kit, black
(2) 82557 | Standard, deep jar, white
(3) 94141 | Eutectic ice pack
 

Thursday, June 14, 2018

Serving a Crowd-Pleasing Continental Breakfast

Better breakfast doesn’t have to mean made-to-order omelets and sandwiches – not every establishment has the staff or facilities. All you need are a few staples and some quality equipment to keep your food at peak flavor throughout the daypart.

Waffles 


Enough said. Who doesn’t love a warm, fluffy waffle first thing in the morning? If you want to be family-friendly, these are a must have.

Oatmeal, Grits or Gravy

Add some fresh or dehydrated fruit to top the oatmeal, and you’ll provide a simple, flavorful balanced breakfast option. Would you rather go for a Southern staple? Try grits or sausage gravy for biscuits. Hold each in a thermostatically controlled warmer – this way nothing gets burned to the insets. Moisture-conserving lids also ensure your items don’t thicken or dry out. Get a twin warmer to serve two!

Fruit and Yogurt Parfaits


Let patrons do a little customization with a parfait bar. Refrigerate pre-portioned bowls of yogurt and set up a mini bar with fresh fruit and granola.

Cereal


Single-serving cereal boxes are wasteful and messy – not to mention they tend to “walk off.” Bulk dispensers deter package pilfering while reducing packaging waste. Invest in a quality cereal dispenser – it can also add some color and excitement to your breakfast display.

Tuesday, May 29, 2018

Station Creation | Brat and Burger Builder


If you’ve ever struggled creating a topping station, we don’t blame you. Finding the perfect configuration can be a tough task – but we’re here to help! Just follow along with our Station Creation Guide!

The Goal

With warm weather comes sporting events; with sporting events come hungry fans – time to stock your concession stand condiment bar.

While looking into equipment, you know you’re going to offer burgers, brats and hot dogs. And whether you’re planning this condiment bar for a small community ball park, a stadium concession stand or a beach front food kiosk, there will always be two must-have condiments: ketchup and mustard.

For additional flavor, pickle relish and diced onions are also safe to supply.

Now that you know your ingredients…

Choose your Base 


You’ll need two jars with pumps for the ketchup and mustard, and two jars with lids and ladles for the relish and onion for a total of 4 standard-sized fountain jars. Select Server’s 4-jar insulated countertop base (SB-4 83600). 

Select your Jars 

Jars come in Standard or Slim, deep or shallow.

Because ketchup and mustard are ubiquitous at any concession stand, it’s safe to say you’ll go through a lot. Standard, deep fountain jars hold 3.5 qt (3.3 L), which equals about (112) 1 oz servings, or about (150) .75 oz servings.

2 qt (1.9 L) standard, shallow jars will work well for the onions and relish. 

Select pumps, lids and accessories 

Pumps on the Station Creation spec sheet are separated by what type of jar and base they fit; for this station, locate the “deep fountain jar” pump and lid fit with the countertop base style.

Next, think of what you’re dispensing. The “Dispenses” key will show three droplet icons for thin, thick and thicker. Ketchup and mustard fall under thick, the middle droplet; therefore your ideal pump will be the CP-F 83330.

Quick tip: When you see “FP” think Fountain Pump and “CP,” think Condiment Pump – “TP,” or thick pumps are for special toppings that require extra force to dispense, like thicker caramel and fudge sauces or pumpable peanut butter.

For the relish and onion jars, the clear hinged lid for standard jars will allow guests to see contents at a self-serve station, and employees can quickly check the fill level. The proper ladle for shallow, standard fountain jars is the 7”, 1 oz ladle (82562), so you’ll select 2 each of the lid and ladle.

Burger and Brat Builder Components
(1) 83600 | SB-4
(2) 83149 | Standard, deep jar, black
(2) 83147 | Standard, shallow jar, black
(2) 83330 | CP-F, condiment pump
(2) 82562 | Ladle, 7” handle, 1 oz
(2) 80310 | Clear, plastic hinged lid, standard jars
(4) 84141 | Eutectic ice packs (use 2, freeze 2)

Fun Fact! Stainless steel pump knobs come in a range of colors, and can be engraved. Choose red and yellow for easy identification!

Tuesday, April 10, 2018

Station Creation | The Bloody Mary Mini Bar


Station Creation can be tricky, but sometimes beginning at the end is your best bet. What do we mean by that?

Like with most planning, it’s best to formulate your goal before you start working toward it – otherwise the path to success might not be so clear. For our first Station Creation, we'll start simple – try following along with our Mini Station Creation Guide, spec sheet 02071.

The Goal

Commonly called a meal in a glass, a Bloody Mary can be garnished with any number of ingredients – considering you have a long enough spear to hold everything.

Say you’d like to go for a simpler garnish sans the broasted chicken or cheeseburger slider. You choose a pickle spear, a green olive, a pickled mushroom, a beef stick and, for the rim, a lemon wedge. Having all ingredients in a dedicated base can speed up the drink-making process, similar to an assembly line.

Now that you know your ingredients…

1. Choose your Base 


You have five garnishes, and one – the pickle spear – is significantly larger than the others, which makes the MB-4 countertop mini station with five jars ideal. Go with the short, 5” model – not only will it fit under your bar counter better, it’ll be easier to stab garnishes at the bottom of a 3 ½" jar rather than a 6" jar with your spear. Besides, stashing back-up jars in a nearby beer cooler keeps garnishes fresh.

2. Select your jars 

For this particular configuration, you'll need (1) 1/9-size jar (represented in blue) and (4) 1/12-size jars (represented in white). If you’d like spare jars to stock back-ups, simply double the amount.

Quick tip: As shown in the picture, (4) 1/12-size jars fit in the space of (3) 1/9-size jars. This way, you can fit more toppings in the same space, and more frequent change-outs means fresher ingredients for your customers!

3. Select your lids and accessories 

In this scenario, stainless steel hinged lids will suit your needs best for the 1/9-size jar – pickle spears are much longer than your other ingredients, so a center-hinged clear lid would make it hard to retrieve them – and clear, hinged lids for the 1/12-size jars so you can keep an eye on fill levels.

MB-4 bases cool ingredients using ice or two of Server’s eutectic ice packs (94013).

Keep your base next to the tomato juice, celery salt, Worcestershire sauce and a drink shaker, and start mixing!

Bloody Mary Bar Part Numbers
- (1) 87590 | MB-4, 5"
- (1) 87202 | 1/9-size jar, black
- (1) 87211 | 1/9-size stainless lid
- (4) 87925 | 1/12-size jars, black
- (4) 87923 | 1/12-size clear hinged lids
- (2) 94013 | Eutectic ice pack

To start assembling your own station, see our Station Creation Guide, sheet 02071!

Have a Station you'd like us to create for you? Leave a comment below!

Want to receive updates when we post a new blog? Subscribe on our website!

Tuesday, February 6, 2018

Frontier Energy Study Validates ConserveWell™ Savings


On the fence about switching to the newest industry technologies? Head to the Food Service Technology Center!

Frontier Energy who works out of the FSTC, and better known as Fishnick, performs efficiency and performance tests on commercial kitchen equipment and appliances, and then provides “education, viable resources and up-to-date information at no cost.”

For more than 25 years, the California-based company has employed its 40-plus standard testing methods to evaluate a range of equipment like commercial kitchen ventilation, water heating and building HVAC and lighting.

In one recent study entitled, “Dipper Well Replacement Evaluation Report” that included Server’s ConserveWell and an additional dipper well alternative, the FSTC “monitored the baseline water and energy use and then replaced the existing dipper wells with the alternative products and calculated savings at two full service restaurants.”

By replacing a heated continuous-flow dipper well with a ConserveWell, one restaurant was able to reduce its water use by 115,900 gallons in a year and save over $2,000.00 in utility costs!

For more details, you can read the full study here.

Ready to see how much you can save? Calculate your savings with our ConserveWell™ ROI calculator!